(from the Spring 2011 issue)
Learn how to use this common—but often overlooked—material to tie better trout flies.
[by Andrew Puls]
I vividly recall my first feeble attempt at tying with biots. It was about 15 years ago in my Montana State University dorm room. My goal was to tie a floating midge pupa—probably size 20—with a wrapped goose-biot body. I have no idea what went wrong, but the frustration and results were enough to make me forgo using biots for the next couple of years. Maybe you can empathize with this experience.
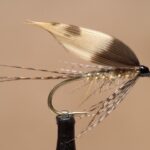
I eventually saw some beautifully segmented mayfly dun imitations tied using my dreaded nemesis: goose biots. I was tired of tying chubby, water-absorbing, dubbed mayfly bodies, and didn’t like the unfi nished look of thread bodies. These new biot-bodied flies looked ultra-realistic, and they seemed unlikely to become waterlogged. After seeing these flies, I became obsessed with biots.
LESSON 1
Selecting and Preparing Biots
Before we can tie any flies, we have to choose and prepare the biots. As you will discover, biots are some of the easiest and most affordable materials to use. They also make great-looking flies!
Selecting and Preparing Biots
What Are Biots?
Biots are the short, stiff fibers found along the leading edge of a bird’s primary wing feathers. Depending upon the species of bird, biots vary significantly in length, stiffness, color, and transparency. Goose and turkey biots, which are commercially available split from the feather stems and dyed almost every imaginable color, are commonly used for making flies. Use goose and turkey biots, along with biots from other wild and domestic birds, to make wrapped bodies, tails, antennae, wing buds, legs, and a host of other parts on your insect imitations.
Before we tie some favorite biot patterns, we need to prepare the material. First and foremost, be critical of the quality of the biots you use. Some stripped stems have biots that are broken, cracked, and the tips singed by the bleaching and dyeing process. This is readily visible when bending the stems. Second, always select the right biots for the job, starting with the proper species of bird. Goose biots are stiffer, produce a thinner fl at rib, and most important, are shorter than turkey biots.
LESSONS 2 & 3
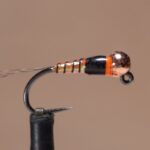
Wrapping a Basic Biot Body
The goal of this first exercise is to learn how to wrap and tie off durable biot bodies. I must credit fly-tying guru A. K. Best with the meat and potatoes of this lesson. As sexy as they are, unreinforced biot bodies are quickly shredded by the trouts’ needle-sharp teeth. If a fly does unravel after using Mr. Best’s method, it is only because it has done its job quite successfully—over and over again.
Wrapping a Basic Biot Body
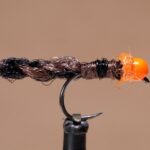
Making a Larva Body and Wing Buds
Now we’ll tie the biot to the hook with the notch facing down and back. This produces a dark, flat rib closely resembling the body of a midge larva or mayfly dun. The wing buds on this midge larva are also made using biots. These must be soaked prior to tying them on because bending them at such a harsh angle almost always causes cracking. Due to their fragile nature, the wing buds and thorax should be covered in epoxy after completing the fly.