Common-sense advice on setting up your first fly-tying bench.
by Bill “Bugs” Logan
FOR BEGINNERS, SETTING UP TO TIE FLIES can at first appear every bit as complicated as gearing up to fish. If you’ve been thinking of giving fly tying a try, I’m sure you’ve already been confronted with a bewildering array of tools. Most of them are ingenious and damned cool looking, too. Of course, that doesn’t help clear up the confusion.
Well, guess what? Tools are just tools, and too often, cleverness overreaches itself. Now, keep in mind that I’ve been tying a long while and have become pretty darned set in my ways. I tend toward minimalism. Other folks have different ideas, and they no doubt swear by many of the tools that I think I don’t need. Let me give you my opinions and tell you why I think the way I do. Regardless of whether you agree with me, remember that the only requirements all fly tying tools must meet are that they be comfortable, function well, and make it easier for you to crank out effective fish getters. A surprisingly lean tool kit, wisely assembled, can take you far.
For Starters
Okay, let’s consider the photograph opening this article. You’re probably looking at the madman and the fishing bear at the left, or the cute photos of my wife holding a lamb as a little girl, and when she was being a really, really good sport the first time I took her fishing. These are important! I’ll tell you why in a bit, but first I want you to forget about all the tying books in the background; they’re there to add atmosphere to my shot. Take away the books and the bric-a-brac, and what’s left is a surprisingly small collection of tools. Notice that I’ve put my own kit together. It’s not a prepackaged beginner’s kit; buy such a kit, and you’ll soon outgrow it. And before you do, you’ll have some frustrating, awkward tying that may turn you away altogether. It’s far better (and in the long run no more expensive) to tool up the right way at the beginning.
A vise is the only item that will cost you a bit. And spend a bit. Don’t begrudge yourself a vise that will serve you long and well. The one in my photo is called the Atlas Vise. (A company called Wolff Indiana manufactures the Atlas Vise.) It’s a good example of a high-quality, middle-of-the-road, workhorse vise. A number of other fine vises are equally worthy.

Your new vise should be a rotary model. This means you can spin the head or jaws to turn the fly over while you’re tying to see how things are coming along on the far side of the hook. You have no idea how convenient that is!
Make sure the vise’s jaws are machined, forged, and/or hardened steel. Cast metal jaws are brittle and may chip if you clamp hooks too close to their tips. And give special notice to how a vise is finished. Good production value and an attention to detail are a telling indication of quality. I especially like it if the fly shop sets up a display vise where customers can play with it; that vise almost surely gets a rough workout. After all this, if there is no play in the joints or fittings, no parts are missing, and the action remains smooth, it is well made. And one last thought: Pedestal-mounted vises are the most convenient. You can use them on any flat surface, whereas C-clamp-mounted models require suitable table edges, which are harder to find than you might think.
We also see a bottle of cement in this photo. Flexament (or a similar flexible or vinyl cement) will take care of every need you encounter during general-purpose tying. It works admirably as a feather coating (such as when making nymph wing cases or beetle backs), as an underlying adhesive for wrapping delicate materials, as a sealant over Magic Marker detailing, and of course, as a head finish. I cut my cement by a third with thinner so that it penetrates and dries faster. When it thickens due to evaporation, I just re-dilute it.
Superglue penetrates most materials and sets in a heartbeat. Some tiers don’t even finish off their flies with a head knot, but instead use a superglue! I routinely add a tiny drop to the bases of split tails and hackles on my dry flies. You should also keep gel (often called gap-filling) glue on hand; it is especially handy when tying with foam.
A bodkin cleaner is no more than an old film canister packed with coarse steel wool. Stab your bodkin into the canister a few times to clean and polish the needle.
Good lighting is important to prevent damaging eyestrain. My tying lamp has an adjustable neck. If you live near an IKEA or a similar bargain home furnishings outlet, you’ll find such a lamp shockingly cheap. Be warned: The switch will wear out in a year or two, at which point you must either buy a new lamp or replace the switch. It took me 20 minutes to rewire my lamp with a new switch that will last for years.
Okay, what’s not in the picture? (Remember, we’re collecting the tools we need, not the tools we want.) First, there’s no bobbin threader. To thread a bobbin, all you have to do is insert the thread in the bottom end of the tube (allow a bit of slack) and suck it through. You also won’t find a whip-finish tool. The most important tools are your hands! The more you depend on them, the better tier you’ll become. It takes just modest effort to learn to tie a head knot by hand, and far less to finish a fly with a series of simple half hitch knots and drop of cement.
The Better to Clip With
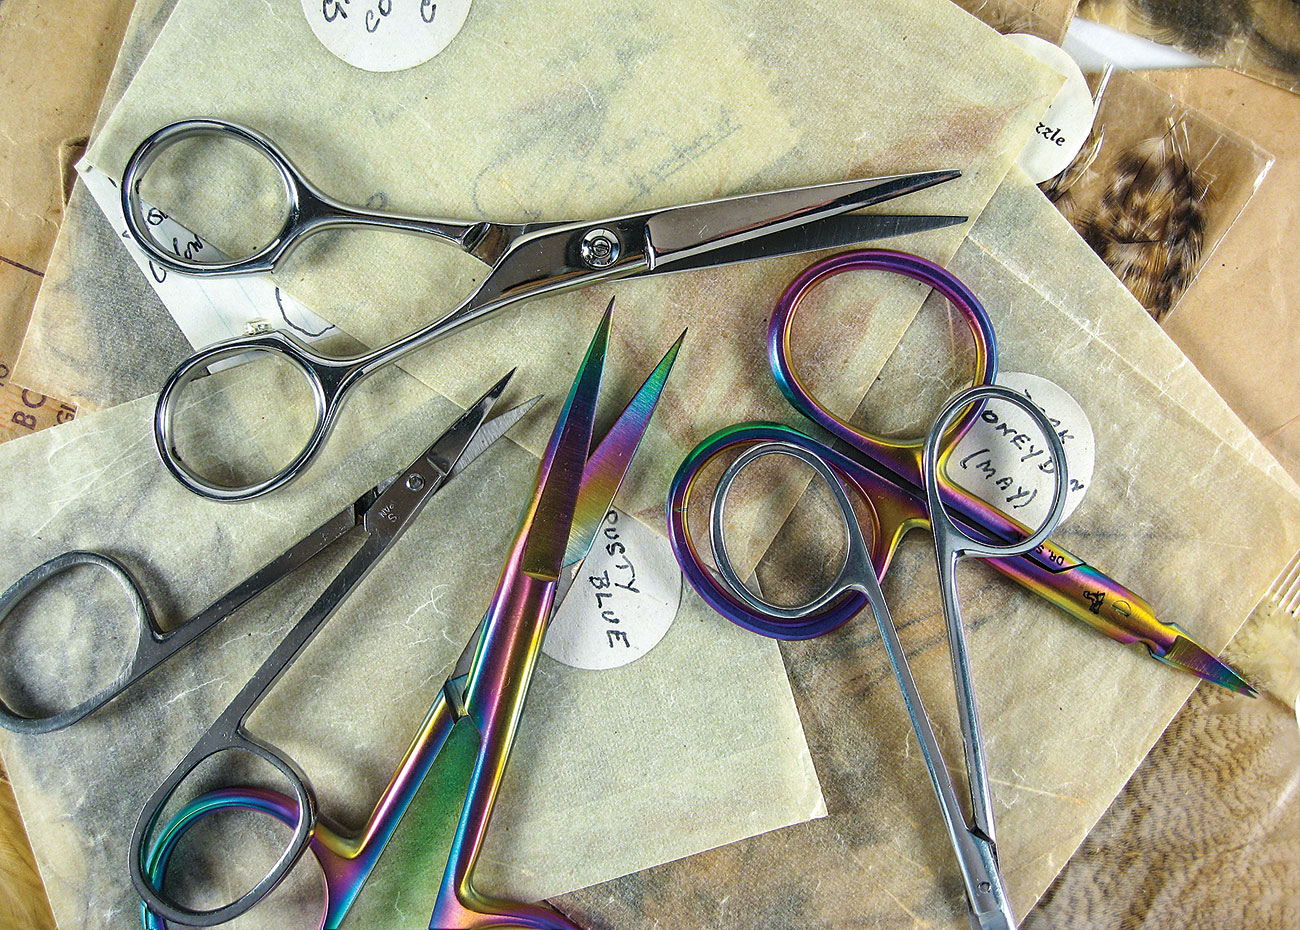
You should have two good pairs of scissors, plus a sacrificial pair. If possible, inspect and purchase scissors in person. Check for smooth, tight action, and pay special attention to the thickness of the blades at the tips. There will be variation between scissors, even from the same manufacturer. Look at scissors not from the side but from the tip end. The finer (or thinner) the tips, the closer they will trim.
Finger-hole size is also important. Scissors must feel comfortable; you’ll be using them a lot. Look at the difference between the two pairs at lower right. Even though the pair on top has fabulous blades, the narrow holes and sharp edges made them far too annoying to use.
Fine scissors should be small bladed. They’re meant for general-purpose work, most of which is delicate. Respect them! Don’t try cutting heavy, hard, or bulky materials with them, and never, ever use them on foam. Some tiers prefer slightly curved blades, but I find straight blades more convenient. I’ve used this pair marketed by Tiemco (lower left) for several years.
Heavy scissors, like the flashy pair seen in the middle (made by Dr. Slick), are meant for clipping or trimming coarse hair, monofilament, ribbing wire, and other materials that would dull fine scissors. They should have slightly larger, straight, serrated blades. I can’t stress that last attribute enough. Serrated scissors grip material marvelously, and I guarantee you’ll be glad for it.
Use sacrificial scissors (at the top) to cut foam or anything else. They can be either reassigned tying scissors that have begun to wear out, a cheap pair of sewing scissors, or even a small pair of household scissors. Chances are you already have some that will do!