A hot-glue gun is a great addition to your fly tying bench.
[by Barry Clarke]
hot-glue gun is a useful tool for tying flies. I suppose you could used melted glue to bind two pieces of material together, such as the feather wings of traditional streamers, but I use the glue as integral parts of some of my patterns. Once you master using hot glue, you can use it to develop new patterns and sometimes as a substitute adhesive. Hot glue is a thermoplastic adhesive that is commonly supplied in cylindrical sticks in various sizes and colors; the hobby size is not only the cheapest but also the easiest to use. Although I am using colored glue in the tying photos, in most patterns I use transparent glue that I can later color with waterproof markers. The regular transparent hot glue is also much easier to handle and shape than colored glue; in most cases it has a lower melting temperature and shorter drying time than the glues containing color and glitter. Most hot-glue pistols and the glue have a heat melting temperature printed on the packet.
Tying with hot glue requires a little more practice and patience than when using most regular materials; I apologize for the pun, but you have to “stick with it.” I seldom use my gun to apply the glue; I do this only for patterns requiring a large amount of glue. If you apply glue to the hook using the gun, you may find finishing a little difficult; the hot glue will often stretch like a long spider’s web. You can eliminate this problem by taking your finger off the trigger of the gun and wrapping the spiderweb around the hook shank quickly until it breaks.
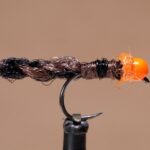
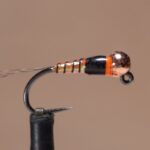
Melt-Glue Caddis Pupa
HOOK: Mustad C49SNP-BR or your favorite curved shank scud or emerger hook, sizes 18 to 12.
THREAD: Black 6/0 (140 denier).
ABDOMEN: Hot glue.
GILLS: Olive Ostrich herl.
ANTENNAE: Two pheasant tail fibers.
THORAX AND HEAD: Cream and black Antron, hare’s-ear dubbing, and cul de canard
Starting the Melt-Glue Caddis Pupa
Instead of using the gun, I often melt the glue directly from the stick using a lighter, or I will cut the required amount of glue from the stick with scissors, grasp one end of the fragment with needle-nose tweezers, warm the other end with the lighter, and the apply the material to the hook. I then continue melting and forming the glue on the hook using the lighter. If the cooled glue body isn’t perfect, trim it to shape using scissors and warm it again to even the surface; repeat this as many times as required.
In addition to coloring the finished body using permanent markers, wrap a foundation of thread on the hook shank before applying the transparent glue. Experiment with different colors of threads to alter the color of the completed transparent body. And on a storage note, if you dry your flies and fly boxes after a trip over a heater, remove your melted-glue patterns first! I’m going to spare you from a long-winded introduction. Instead, let me suggest that you purchase a hot-glue gun at your local craft store or fly shop (yes, even some fly shops and catalogs carry hot-glue guns), a few sticks of glue, and settle down at your tying bench with this magazine. Over the course of the next couple of hours, I think you’ll discover the real possibilities of making flies using a glue gun.
The Melt-Glue Caddis Pupa
We can generally divide the emerging caddisfly pupae into two groups: those that hatch at the surface in open water, and those that make their way to shore, where they climb onto plants or other available structures to transform into winged adults. When caddisflies are hatching, a good pupa imitation can make the difference between catching fish and leaving the river empty-handed. When fishing the Melt-Glue Caddis Pupa, I like to dress only the head and collar with a good floatant such as CDC Oil. This product is designed for use on flies tied with cul de canard; never use regular a fly floatant on CDC. In addition to adding buoyancy to the fly, CDC Oil creates a perfect air bubble around the head just like on the natural insect.
The Melt-Glue Caddis Pupa begins fishing properly only after it has soaked up a little water. When the porous leather and dubbed underbody have absorbed water, and the head is dressed with CDC Oil, this fly sinks so slowly that it almost hangs just under the surface. I like to let it sink for 10 to 12 seconds or so before beginning my retrieve, but keep alert during this free fall period; cruising fish will also pick the Melt-Glue Caddis Pupa on the drop. After the pupa has had time to sink, carefully mend the slack out of the line and lift the tip of the rod so that the pupa rushes toward the surface; this is when a fish normally strikes.
Finishing the Melt-Glue Caddis Pupa
Knowing your glue is the trick to tying this pattern. You must have the drying or hardening time down to a fine art. If the glue is too fluid, the ostrich herl rib will sink into the soft goo and ruin the fly. But, if the glue sets too quickly, the herl will not penetrate into the body, and it will break or slide down the body and unravel when fished. Take the time to make a few tests to check the drying time of the glue you are using. Practice makes perfect, and you will soon tie a perfect Melt-Glue Caddis Pupa.
Wow, what a great article! Barry Clarke is a master at creating new flies using inventive tying techniques. And, to top it off, he is a master photographer, so he can easily share his ideas. Barry lives in Norway. See more of Barry’s work at thefeatherbender.com.